How to Sign PDFs Using Digital Certificates in PHP, Laravel and Symfony
Introduction
In this guide, we will walk you through the process of signing PDFs digitally using a PHP and Laravel environment. We’ll be covering how to accomplish this using PHP code within your Laravel application. We’ll be utilizing a free external service API called pdfsignify.com, which simplifies the digital signing process and allows for easy personalization of signatures.
Digital signatures ensure the authenticity and integrity of your PDFs. To sign a PDF, you’ll need a digital certificate in the form of a
.pfx or .p12 file, which contains your private key and certificate. Additionally, you'll need the password associated with your certificate file.Part 1: Setting Up a Laravel Application
In this step, we’ll set up a new Laravel application that will handle generating and signing PDFs. Laravel provides a powerful and elegant framework to streamline your development process. We’ll use GuzzleHTTP for making API requests to sign the PDFs and the File Storage system in Laravel to read and manipulate the content of a PDF file.
If you already have your Laravel project set up and only need the PDF signing functionality, feel free to skip this part.
First, ensure that Composer is installed on your machine, as Laravel relies on it for managing dependencies. Then, open your terminal and create a new Laravel project:
Copy
composer create-project --prefer-dist laravel/laravel pdf-signing-appThis command will create a new Laravel project in a directory named
pdf-signing-app.Step 1: Set Up the Laravel Environment
Navigate to your project directory:
Copy
cd pdf-signing-appNext, set up your environment file. Laravel provides an .env.example file, which you can copy to create your .env file:
Copy
cp .env.example .envGenerate the application key to ensure your sessions and other encrypted data remain secure:
Copy
php artisan key:generateNow, your Laravel environment is set up and ready for further development.
Step 2: Configure Laravel
Now, it’s time to configure your Laravel application. First, we’ll update the
.env file to set up your database connection. In this example, we'll use the MySQL driver. Open the
.env file in your Laravel project directory. Look for the following section, which is related to database configuration:Copy
DB_CONNECTION=mysql
DB_HOST=127.0.0.1
DB_PORT=3306
DB_DATABASE=your_database_name
DB_USERNAME=your_database_username
DB_PASSWORD=your_database_password
Step 3: Migrate the Database
Once your database connection is configured and working, run the Laravel migrations to set up your database schema:
Copy
php artisan migrateThis command will create the necessary tables in your MySQL database.
Now, your Laravel application is configured and connected to the MySQL database. You can proceed with building your application!
Part 2: Setting Up PDF Signify
Now that our Laravel server is up and running, it's time to set up PDF Signify to sign our PDFs. PDF Signify is a free service that allows us to easily add digital signatures to our PDF files. In this section, we'll guide you through the process of creating an account and preparing the service for use.
Step 1: Create an Account or Log In
1- Visit the PDFSignify Website: Go to the PDFSignify website at pdfsignify.com.
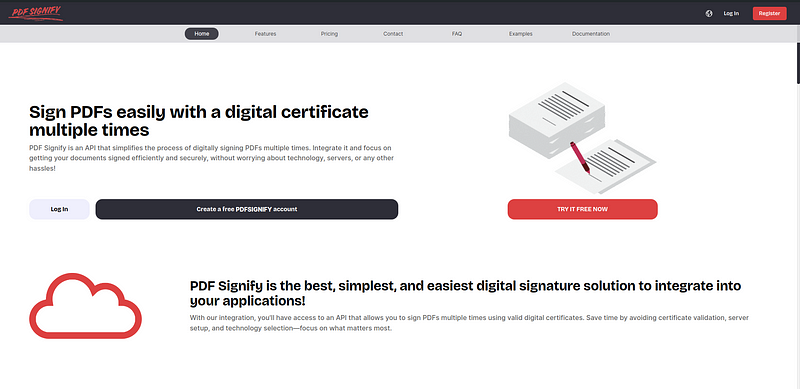
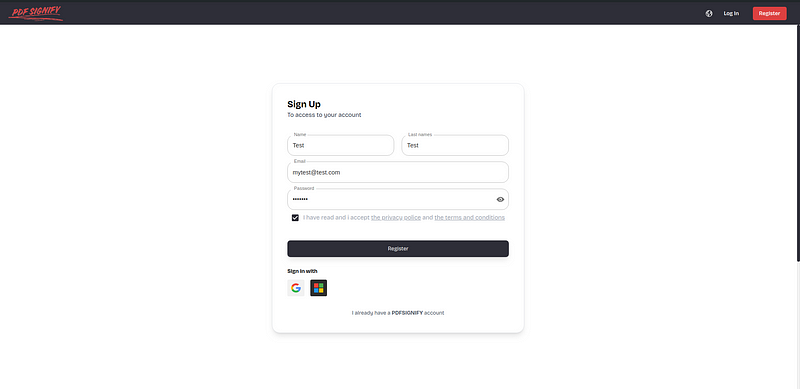
2- Register for an Account or Login: If you don't have an account yet, click on the "Register" button.
You have the option to sign up using Google or Microsoft accounts for a quick registration process. If you prefer manual registration, fill in your details (email, password, etc.) and complete the registration process.
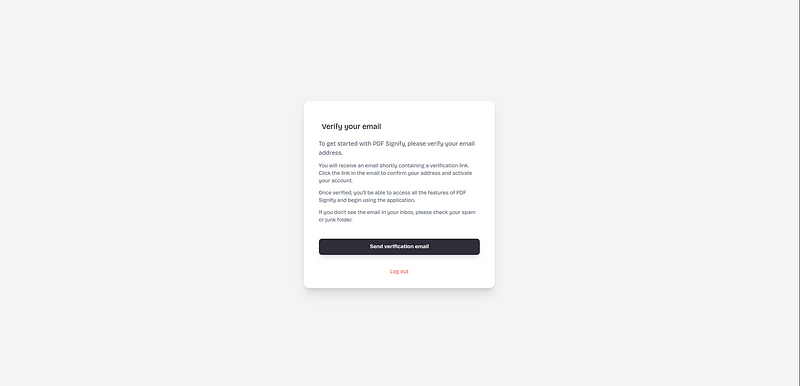
Step 2: Verify Your Email
After registering, you will need to verify your email address to activate your account:
1- Check Your Inbox: Shortly after registering, you'll receive a verification email from PDFSignify.
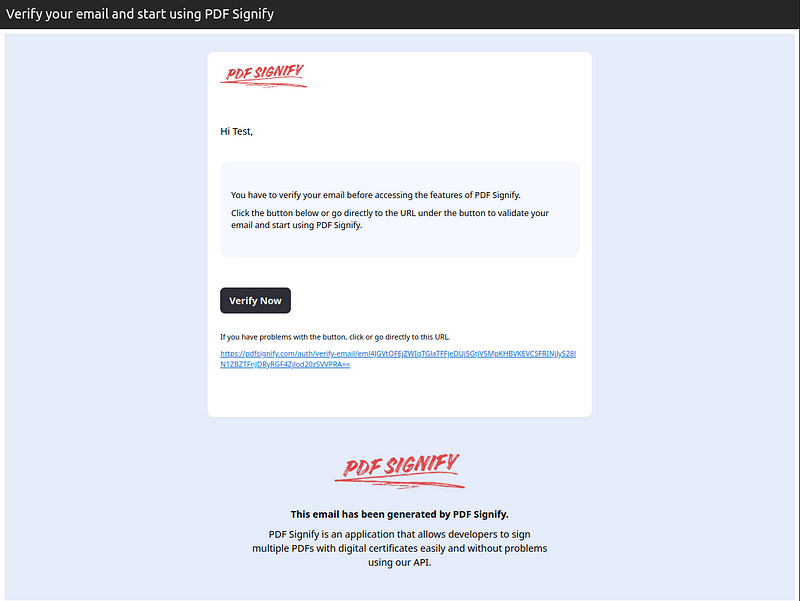
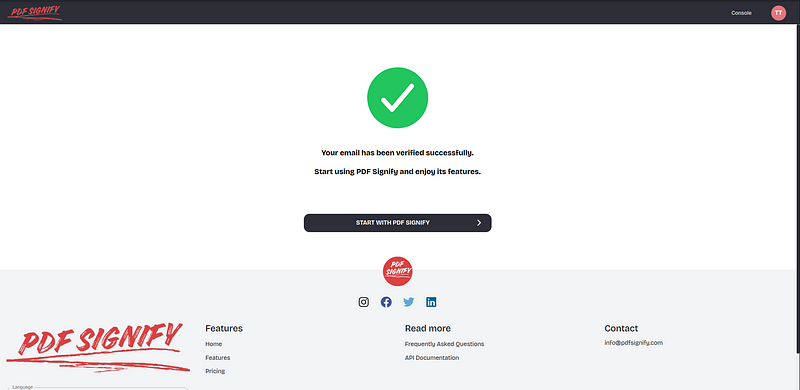
2- Click the Verification Button: Open the email and click on the provided verification button or link to confirm your email address.
3- Didn't Receive the Email?: If you don't receive the email within a few minutes, check your spam or junk folder. If it's still not there, return to the PDFSignify dashboard and request another verification email.
Step 3: Create a New Project in PDFSignify
Now that you have verified your email and gained access to the PDFSignify dashboard, it's time to create a new project to begin working with the service. This will allow you to generate API keys, track usage, and manage your digital signatures.
1- Choose a Plan: Upon creating a new project, you'll be prompted to select a pricing plan. For our purposes, we will use the Free Plan, which comes with limitations but is sufficient for testing and basic usage.
The Free Plan typically includes a limited number of API calls per month, so keep this in mind during development.
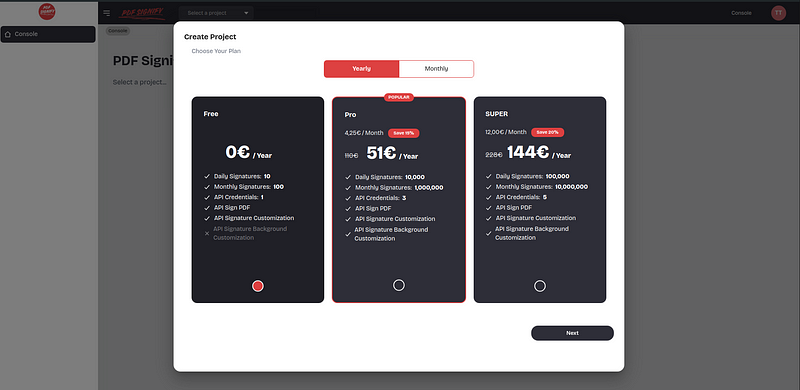
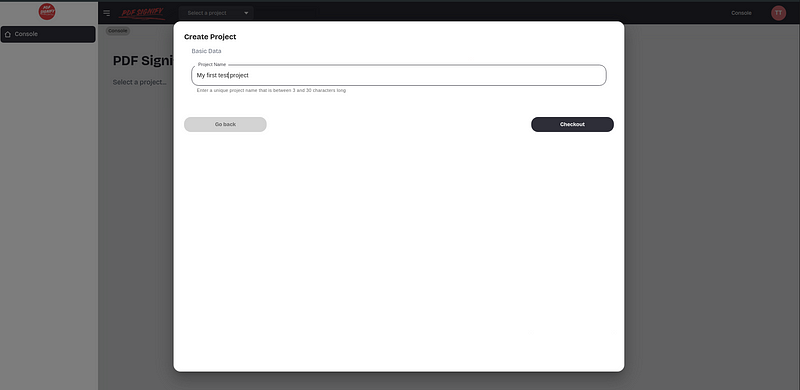
2- Project Setup: After selecting the pricing plan, click next and give a name to your project.
Step 4: Explore the Admin Dashboard
With your project created, you can now view the Admin Dashboard. This is where you'll find important information and controls related to your project:
1- API Usage: The dashboard will show details about your API usage, including the number of API calls you've made and your remaining quota.
2- Limits: ou can also view your plan's limitations, such as the maximum number of API requests and any other restrictions associated with the Free Plan.
3- API Keys: In the dashboard, you'll find your API keys, which is essential for authenticating your requests from the Laravel or PHP server. Copy this key and keep it safe, as you'll need it in the next steps.

Part 3: Create API Credentials
Now that your project is set up in PDF Signify, the next step is to create API credentials. These credentials are essential for authenticating your requests to the PDF Signify API from your Laravel or PHP server server. Follow the steps below to create and manage your API credentials.
Step 1: Navigate to the API Credentials Section
Locate and click on the "API Credentials" option in the sidebar. This is where you can create and manage your API keys.
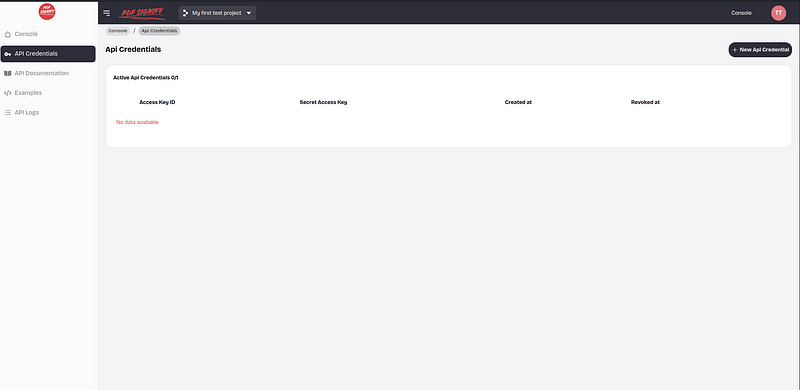
Step 2: Create New API Credentials
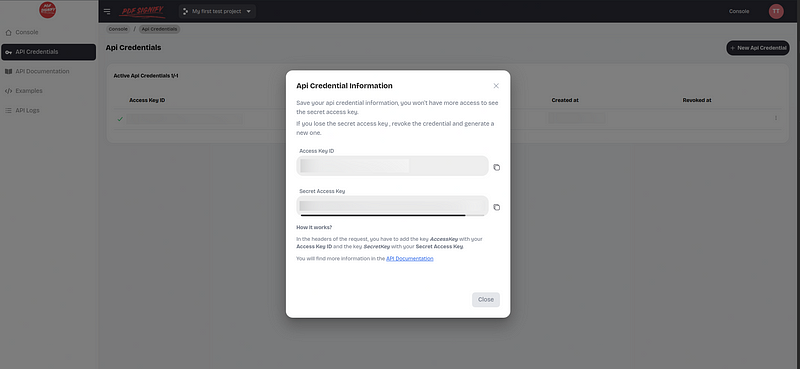
In the API Credentials section, you'll see a "Create Credentials" button. Click on this button to generate a new set of API credentials.
After clicking the button, a popup will appear showing your new API credentials. These include:
- API Key:Used to authenticate your API requests.
- Secret Key:Used to sign your requests securely
The secret key will only be shown once, so make sure to copy and save it in a secure location. If you lose it, you will need to regenerate a new set of credentials.
Part 4: Coding the Laravel / PHP / Symfony Application
Now that we have our PDF Signify API credentials, it's time to integrate them into our Laravel and PHP application. For this example, we’ll use an already created PDF to save time.
f you need to generate a PDF first, you can use a library like Dompdf or TCPDF. However, once the PDF is generated, you can directly send its contents to PDF Signify without saving and reading the file again.
Step 1: Save the Already Created PDF
Before we move on to signing the PDF, let’s save the PDF file that you’ll be working with. This file will be stored in the
storage/app/ directory of your Laravel project.1- Obtain the PDF File: Ensure you have the PDF file that you want to sign. If you’ve generated the PDF elsewhere, make sure it’s ready.
2- Save the PDF in the
storage/app/ Directory: Move or copy your PDF file to the storage/app/ directory of your Laravel project. Rename the file to filepdf.pdf.For example, your project directory structure should look like this:
Copy
laravel-project/
│
├── app/
├── bootstrap/
├── config/
├── database/
├── public/
├── resources/
├── routes/
├── storage/
│   └── app/
│       └── filepdf.pdf
├── tests/
└── artisan
Step 2: Create a New Route to Sign PDFs
Next, we’ll create a new web route to handle the signing of our PDFs. We’ll also edit our controller to add the logic for signing the PDFs.
1. Define the Route: Open the
routes/web.php file in your Laravel project. Add a new route that points to a controller method responsible for signing the PDFs.Copy
use AppHttpControllersPDFSignController;

Route::get('/sign-pdf', [PDFSignController::class, 'signPDF'])->name('sign.pdf');
2. Edit the Controller: Open or create the
PDFSignController.php in the app/Http/Controllers/ directory. Add a method called signPDF that will handle the logic for signing the PDF.Copy
<?php

namespace AppHttpControllers;
use IlluminateSupportFacadesStorage; // USED TO READ THE FILES
use CURLFile; // USED FOR THE multiplatform/request

class PDFSignController extends Controller
{
    public function signPDF()
    {
        dd('Sign pdf');
    }
}
With this route and controller method in place, navigating to /sign-pdf in your browser will trigger the signing process for the PDF stored in
storage/app/filepdf.pdf.Step 3: Set Up Your Signing Certificate and Password
To sign PDFs using a digital certificate, you need to have a valid certificate file and its associated password. In this step, you’ll place your certificate in the
storage/app/ directory of your Laravel project and configure your application to use it.1. Obtain Your Digital Certificate: Ensure you have your digital certificate file ready. This could be in
.pfx or .p12 format.2. Place the Certificate in the
storage/app/ Directory: Move or copy your certificate file to the storage/app/ directory of your Laravel project. Rename the file to certificate.pfx or certificate.p12.Your Laravel project directory should now include the certificate file in the
storage/app/ directory:Copy
laravel-project/
│
├── app/
├── bootstrap/
├── config/
├── database/
├── public/
├── resources/
├── routes/
├── storage/
│   └── app/
│       ├── filepdf.pdf
│       └── certificate.pfx   // or certificate.p12
├── tests/
└── artisan
Step 4: Read the Necessary Files in the Code
To finalize the setup, you’ll need to ensure that your code correctly reads the PDF and certificate files and securely manages the certificate password.
In your
/sign-pdf route, read the PDF and certificate files using the Laravel Storage component. Here’s how to integrate these into your existing function adding this:Copy
$certPath = Storage::path('certificate.pfx');
$pdfPath = Storage::path('filepdf.pdf');
$password = 'YOUR_CERTIFICATE_PASSWORD';
Step 5: Create the Form Data to Prepare the Request
To send a
multipart/form-data request for signing a PDF in PHP, you need to prepare the form data correctly. This involves creating the request with the certificate file, certificate password, and the PDF file to be signed. In PHP, you can use the cURL library or the GuzzleHTTP client to achieve this.Here's how you can implement this:
Copy
// Define the form data to send
$postFields = [
    'certificate' => new CURLFile($certPath, 'application/x-pkcs12', 'certificate.pfx'),
    'certificatePassword' => $password,
    'pdf' => new CURLFile($pdfPath, 'application/pdf', 'filepdf.pdf')
];
Step 6: Execute the Request and Handle the Result
Now that we have set up the form data and included the necessary fields, it’s time to execute the request to sign the PDF. We’ll use
curl to make the POST request to the PDFSignify API and handle the response.Add this in the route:
Copy
// Prepare the cURL request
$ch = curl_init();
// Set the URL for the PDF Signify API endpoint
curl_setopt($ch, CURLOPT_URL, 'https://api.pdfsignify.com/api/v1/sign-pdf');
// Set the cURL options
curl_setopt($ch, CURLOPT_POST, 1);
curl_setopt($ch, CURLOPT_POSTFIELDS, $postFields);
curl_setopt($ch, CURLOPT_RETURNTRANSFER, true);


// Set the headers
$headers = [
    'Content-Type: multipart/form-data',
    'AccessKey: ' . 'MY_ACCESS_KEY',
    'SecretKey: ' . 'MY_SECRET_KEY'
];
curl_setopt($ch, CURLOPT_HTTPHEADER, $headers);

// Execute the request
$response = curl_exec($ch);
// Get the HTTP status code
$statusCode = curl_getinfo($ch, CURLINFO_HTTP_CODE);
// Close the cURL session
curl_close($ch);
// Check for errors if the response code is NOT OK
if ($statusCode != 200) {
    return response()->json(['response' => $response], 500);
}

// Return the signed PDF as a response
return response($response, 200)
    ->header('Content-Type', 'application/pdf')
    ->header('Content-Disposition', 'attachment; filename='signed_filepdf.pdf'');
IMPORTANT: In the request headers, replace
MY_ACCESS_KEY with the access key you generated on the PDFSignify website, and replace MY_SECRET_KEY with the secret key generated in your credentials.Now, you're
app/Http/Controllers/PDFSignController.php file will look like:Copy
<?php

namespace AppHttpControllers;

use CURLFile;
use IlluminateSupportFacadesStorage;

class PDFSignController extends Controller
{
    public function signPDF()
    {

        $certPath = Storage::path('certificate.pfx');
        $pdfPath = Storage::path('filepdf.pdf');
        $password = 'YOUR_CERTIFICATE_PASSWORD';

        // Define the form data to send
        $postFields = [
            'certificate' => new CURLFile($certPath, 'application/x-pkcs12', 'certificate.pfx'),
            'certificatePassword' => $password,
            'pdf' => new CURLFile($pdfPath, 'application/pdf', 'filepdf.pdf')
        ];

        // Prepare the cURL request
        $ch = curl_init();
        // Set the URL for the PDF Signify API endpoint
        curl_setopt($ch, CURLOPT_URL, 'https://api.pdfsignify.com/api/v1/sign-pdf');
        // Set the cURL options
        curl_setopt($ch, CURLOPT_POST, 1);
        curl_setopt($ch, CURLOPT_POSTFIELDS, $postFields);
        curl_setopt($ch, CURLOPT_RETURNTRANSFER, true);


        // Set the headers
        $headers = [
            'Content-Type: multipart/form-data',
            'AccessKey: ' . 'MY_ACCESS_KEY',
            'SecretKey: ' . 'MY_SECRET_KEY'
        ];
        curl_setopt($ch, CURLOPT_HTTPHEADER, $headers);

        // Execute the request
        $response = curl_exec($ch);
        // Get the HTTP status code
        $statusCode = curl_getinfo($ch, CURLINFO_HTTP_CODE);
        // Close the cURL session
        curl_close($ch);
        // Check for errors if the response code is NOT OK
        if ($statusCode != 200) {
            return response()->json(['response' => $response], 500);
        }

        // Return the signed PDF as a response
        return response($response, 200)
            ->header('Content-Type', 'application/pdf')
            ->header('Content-Disposition', 'attachment; filename='signed_filepdf.pdf'');
    }
}
Step 7: Rerun the Server and Test the Sign Route
Now it's time to test your implementation.
Restart your server if is necessary using the
php artisan serve command.Open your web browser and navigate to the sign route by entering the following URL
sign-pdf route http://localhost:8000/sign-pdfPart 5: Check the results
Error Response
If you encounter an error, you will see a message indicating the issue and its cause. Common errors include:
1. PDF not saved with the correct name: Ensure the file name matches the required format.
2. Certificate not saved with the correct name: Verify both the file name and extension are correct.
3. Incorrect certificate password: Double-check that the password you entered is correct.
4. Incorrect API credentials: Review your API credentials and regenerate them if necessary.
Success Response
Once the route is opened, you will see the signed PDF. However, the signatures may not appear in the browser.
To view the signatures, download the PDF and open it with a PDF viewer on your operating system. On Windows and macOS, you can use
Adobe Reader, while on Linux, you can use the default Document Viewer .The signature will be visible at coordinates (0,0), which is located at the bottom left corner of the page.

Part 6: Customize the Signature
Pdfsignify offers a wide range of features to customize your signature. In this section, we'll explore many of the available customization options.
For a complete list of features and options, you can refer to the documentation here.
Step 1: Background Image Customization:
To customize the background image, a payment account is required. Once you have a payment account, you can set your logo as the background image by using the
signatureBackgroundImage parameter.This involves sending the image using the
CurlFile for the customization:Copy
$certPath = Storage::path('certificate.pfx');
$pdfPath = Storage::path('filepdf.pdf');
$password = 'YOUR_CERTIFICATE_PASSWORD';

$signatureBackgroundImage = Storage::path('backgroundImage.png');
// Define the form data to send
$postFields = [
    'certificate' => new CURLFile($certPath, 'application/x-pkcs12', 'certificate.pfx'),
    'certificatePassword' => $password,
    'pdf' => new CURLFile($pdfPath, 'application/pdf', 'filepdf.pdf'),
    'signatureBackgroundImage' => new CURLFile($signatureBackgroundImage, 'image/png', 'logo.png'),
];
Step 2: Image Near The Signature:
If you don't have a paid account, you can still display your logo by using the
signatureImage parameter. This allows you to place an image near the signature.Copy
$signatureImage = Storage::path('signatureImage.png');
// Define the form data to send
$postFields = [
    'certificate' => new CURLFile($certPath, 'application/x-pkcs12', 'certificate.pfx'),
    'certificatePassword' => $password,
    'pdf' => new CURLFile($pdfPath, 'application/pdf', 'filepdf.pdf'),
    'signatureImage' => new CURLFile($signatureImage, 'image/png', 'logo.png'),
];
Step 3: Signature parameters
In the documentation, you can find various parameters to customize the signature display and its values:
timezone: Timezone for the signature timestamp in PHP format. Default is UTC. View the list of all available timezonessignatureFieldName: Unique field name for the signature (default will set an automatically unique name)signatureXPosition: Set the X position of the signature in pixels relative to the left edge of the PDF. A value of 0 corresponds to the far left. (Default is 0).signatureYPosition: Set the Y position of the signature in pixels relative to the bottom of the PDF. The value of 0 corresponds to the very bottom of the PDF. (Default is 0)signatureWidth: Width in pixels of the signature (default 100)signatureHeight: Height in pixels of the signature (default 50)signatureMessage: Visual message label for the signature (default 'Signed digitally')signaturePageAppearance: Page(s) which will appear the signature. Can be an integer to specify a single page, an array of integers to specify multiple pages, or -1 to signify all pages. Default is 1.signatureDateLabel: Label for the signature date (default 'Date: ')signatureDateFormat: Format for the signature date in PHP format (default 'd-m-Y H:i:s')signarureReasonLabel: Label for the signature reason (default 'Reason:')signatureReason: Reason for the signature (default null)signatureLocation: Location of the signature (default null)signatureContactInfo: Contract info for the signature (default null)signatureShowDistinguishedName: Show the Distinguished Name (DN) in the signature, including the proprietary name and all information related to the signature (default: false).You can find some examples in the following code:
Copy
// Customize signature appearance and position
$postFields['signaturePageAppearance'] = -1; // Page number for signature (-1 for all pages or specify an array of pages)
$postFields['timezone'] = 'UTC'; // Timezone for signature date and time
$postFields['signatureMessage'] = 'Digitally signed by the user'; // Reason/message for the signature
$postFields['signatureDateLabel'] = ''; // Label for the signature date (empty string for no label)
$postFields['signatureDateFormat'] = 'Y-m-d H:i:s'; // Format for the signature date
$postFields['signatureHeight'] = 100; // Signature height in pixels
$postFields['signatureWidth'] = 150; // Signature width in pixels
$postFields['signatureYPosition'] = 100; // Y position of the signature relative to the bottom of the page
$postFields['signatureXPosition'] = 180; // X position of the signature relative to the left of the page
Step 4: PDF Metadata
When you sign a PDF, PDF Signify also allows you to modify the metadata. The following parameters are available for this purpose:
pdfMetadataTitle: Title of the PDF document.pdfMetadataSubject: Subject of the PDF document.pdfMetadataAuthor: Author of the PDF document.pdfMetadataKeywords: Keywords associated with the PDF document.pdfMetadataCreator: Creator application of the PDF document.pdfMetadataProducer: Producer application of the PDF document.pdfMetadataCreationDate: Creation date of the PDF document in ISO 8601 format (e.g.,2024–01–01 10:00:00).pdfMetadataModificationDate: Last modification date of the PDF document in ISO 8601 format (e.g.,2024–01–01 10:00:00).Copy
// Optional: Modify PDF metadata
$postFields['pdfMetadataAuthor'] = 'AUTHOR'; // PDF author
$postFields['pdfMetadataKeywords'] = 'keywords,keyword2'; // PDF keywords
$postFields['pdfMetadataTitle'] = 'MY DOCUMENT'; // PDF title
$postFields['pdfMetadataSubject'] = 'EXAMPLE DOCUMENT'; // PDF subject
$postFields['pdfMetadataCreator'] = 'PDFSIGNIFY'; // PDF creator software
$postFields['pdfMetadataProducer'] = 'PDFSIGNIFY'; // PDF producer software
// Get current date and time for metadata
$currentDateTime = (new DateTime())->format('Y-m-d H:i:s'); // Format as 'Y-m-d H:i:s'
// Assign creation and modification dates
$postFields['pdfMetadataCreationDate'] = $currentDateTime; // Creation date
$postFields['pdfMetadataModificationDate'] = $currentDateTime; // Modification date
IMPORTANT: You can also use the
/api/v1/set-pdf-metadata endpoint with the same parameters to change the PDF metadata without needing to sign the document. You can find more information here.You can find the complete file
PDFSignController.phpwith all the examples:Copy
<?php

namespace AppHttpControllers;

use CURLFile;
use IlluminateSupportFacadesStorage;

class PDFSignController extends Controller
{
    public function signPDF()
    {

        $certPath = Storage::path('certificate.pfx');
        $pdfPath = Storage::path('filepdf.pdf');
        $password = 'password';

        $signatureBackgroundImage = Storage::path('backgroundImage.png'); // Append the custom background image to the form data (optional)
        //$signatureImage = Storage::path('signatureImage.png'); // Append the custom  image near the signature (optional)
        // Define the form data to send
        $postFields = [
            'certificate' => new CURLFile($certPath, 'application/x-pkcs12', 'certificate.pfx'),
            'certificatePassword' => $password,
            'pdf' => new CURLFile($pdfPath, 'application/pdf', 'filepdf.pdf'),
            'signatureBackgroundImage' => new CURLFile($signatureBackgroundImage, 'image/png', 'logo.png'),
            //'signatureImage' => new CURLFile($signatureImage, 'image/png', 'logo.png'),
        ];

        // Customize signature appearance and position
        $postFields['signaturePageAppearance'] = -1; // Page number for signature (-1 for all pages or specify an array of pages)
        $postFields['timezone'] = 'UTC'; // Timezone for signature date and time
        $postFields['signatureMessage'] = 'Digitally signed by the user'; // Reason/message for the signature
        $postFields['signatureDateLabel'] = ''; // Label for the signature date (empty string for no label)
        $postFields['signatureDateFormat'] = 'Y-m-d H:i:s'; // Format for the signature date
        $postFields['signatureHeight'] = 100; // Signature height in pixels
        $postFields['signatureWidth'] = 150; // Signature width in pixels
        $postFields['signatureYPosition'] = 100; // Y position of the signature relative to the bottom of the page
        $postFields['signatureXPosition'] = 180; // X position of the signature relative to the left of the page

        // Optional: Modify PDF metadata
        $postFields['pdfMetadataAuthor'] = 'AUTHOR'; // PDF author
        $postFields['pdfMetadataKeywords'] = 'keywords,keyword2'; // PDF keywords
        $postFields['pdfMetadataTitle'] = 'MY DOCUMENT'; // PDF title
        $postFields['pdfMetadataSubject'] = 'EXAMPLE DOCUMENT'; // PDF subject
        $postFields['pdfMetadataCreator'] = 'PDFSIGNIFY'; // PDF creator software
        $postFields['pdfMetadataProducer'] = 'PDFSIGNIFY'; // PDF producer software
        // Get current date and time for metadata
        $currentDateTime = (new DateTime())->format('Y-m-d H:i:s'); // Format as 'Y-m-d H:i:s'
        // Assign creation and modification dates
        $postFields['pdfMetadataCreationDate'] = $currentDateTime; // Creation date
        $postFields['pdfMetadataModificationDate'] = $currentDateTime; // Modification date
        // Prepare the cURL request
        $ch = curl_init();
        // Set the URL for the PDF Signify API endpoint
        curl_setopt($ch, CURLOPT_URL, 'https://api.pdfsignify.com/api/v1/sign-pdf');
        // Set the cURL options
        curl_setopt($ch, CURLOPT_POST, 1);
        curl_setopt($ch, CURLOPT_POSTFIELDS, $postFields);
        curl_setopt($ch, CURLOPT_RETURNTRANSFER, true);


        // Set the headers
        $headers = [
            'Content-Type: multipart/form-data',
            'AccessKey: ' . 'MY_ACCESS_KEY',
            'SecretKey: ' . 'MY_SECRET_KEY'
        ];
        curl_setopt($ch, CURLOPT_HTTPHEADER, $headers);

        // Execute the request
        $response = curl_exec($ch);
        // Get the HTTP status code
        $statusCode = curl_getinfo($ch, CURLINFO_HTTP_CODE);
        // Close the cURL session
        curl_close($ch);
        // Check for errors if the response code is NOT OK
        if ($statusCode != 200) {
            return response()->json(['response' => $response], 500);
        }

        // Return the signed PDF as a response
        return response($response, 200)
            ->header('Content-Type', 'application/pdf')
            ->header('Content-Disposition', 'attachment; filename='signed_filepdf.pdf'');
    }
}
Step 5: Verify Certificate Validity and Password Match
PDF Signify also allows you to verify if a certificate is valid and if the password matches.
To perform this check, use the
/api/v1/check-certificate-password endpoint. You can find more information here.This method uses only two parameters: the certificate (
certificate), as used previously, and the certificate password (certificatePassword).You can use the following example with the (
/check-certificate)endpoint in the routes/web.php file:Copy
Route::get('/check-certificate', [PDFSignController::class, 'checkCertificate'])->name('check.certificate');
And adding the function
checkCertificate in the PDFSignController.php:Copy
public function checkCertificate(){
    $certPath = Storage::path('certificate.pfx');
    $password = 'password';
    $postFields = [
        'certificate' => new CURLFile($certPath, 'application/x-pkcs12', 'certificate.pfx'),
        'certificatePassword' => $password,
    ];
    $ch = curl_init();
    // Set the URL for the PDF Signify API endpoint
    curl_setopt($ch, CURLOPT_URL, 'https://api.pdfsignify.com/api/v1/check-certificate-password');
    // Set the cURL options
    curl_setopt($ch, CURLOPT_POST, 1);
    curl_setopt($ch, CURLOPT_POSTFIELDS, $postFields);
    curl_setopt($ch, CURLOPT_RETURNTRANSFER, true);


    // Set the headers
    $headers = [
        'Content-Type: multipart/form-data',
        'AccessKey: ' . 'MY_ACCESS_KEY',
        'SecretKey: ' . 'MY_SECRET_KEY'
    ];
    curl_setopt($ch, CURLOPT_HTTPHEADER, $headers);

    // Execute the request
    $response = curl_exec($ch);
    return response()->json(['response' => $response]);
}
In this case, the response will be in
application/json format and may indicate success as follows:Copy
{'success':true,'message':'The certificate password is correct!','errors':[],'data':{},'auth':true}Alternatively, the response may indicate that the certificate or password is not valid, as shown below:
Copy
{'success':false,'message':'The certificate password is not correct!','errors':['certificatePassword'],'data':{},'auth':true}Part 7: Conclusions
In conclusion, we have explored a comprehensive example of how to sign PDFs using Laravel, Simphony or PHP, and the PDF Signify application. We’ve seen how this service can assist in signing any PDF document, setting PDF metadata, or verifying a certificate with ease, and it can be integrated with various technologies.
For more information, you can visit the following resources:
- API Documentation: https://api.pdfsignify.com/api/documentation#/
- Examples: https://pdfsignify.com/#examples
- Website: https://pdfsignify.com/
If you have further questions, you can contact PDF Signify support via email.